It sounds overwhelming, but cleaning up your sterile processing data can be easier than you think if you approach it systematically.
Make your manual tracking system electronic.
Easier said than done? Not if you choose the right system and have your key employees on the same page with supplier, catalog number, and description nomenclature. Choose a tracking system with the following capabilities:
- Capacity to track all product catalog information in one place
- The ability to maintain two names for each product, one for your team and one for the OR. For example:
- Description: CLAMP BACKHAUS TOWEL 3.5IN
- Alias: TOWEL CLIP SHORT
- The ability to edit tracking data to accommodate organizational restructuring or input errors
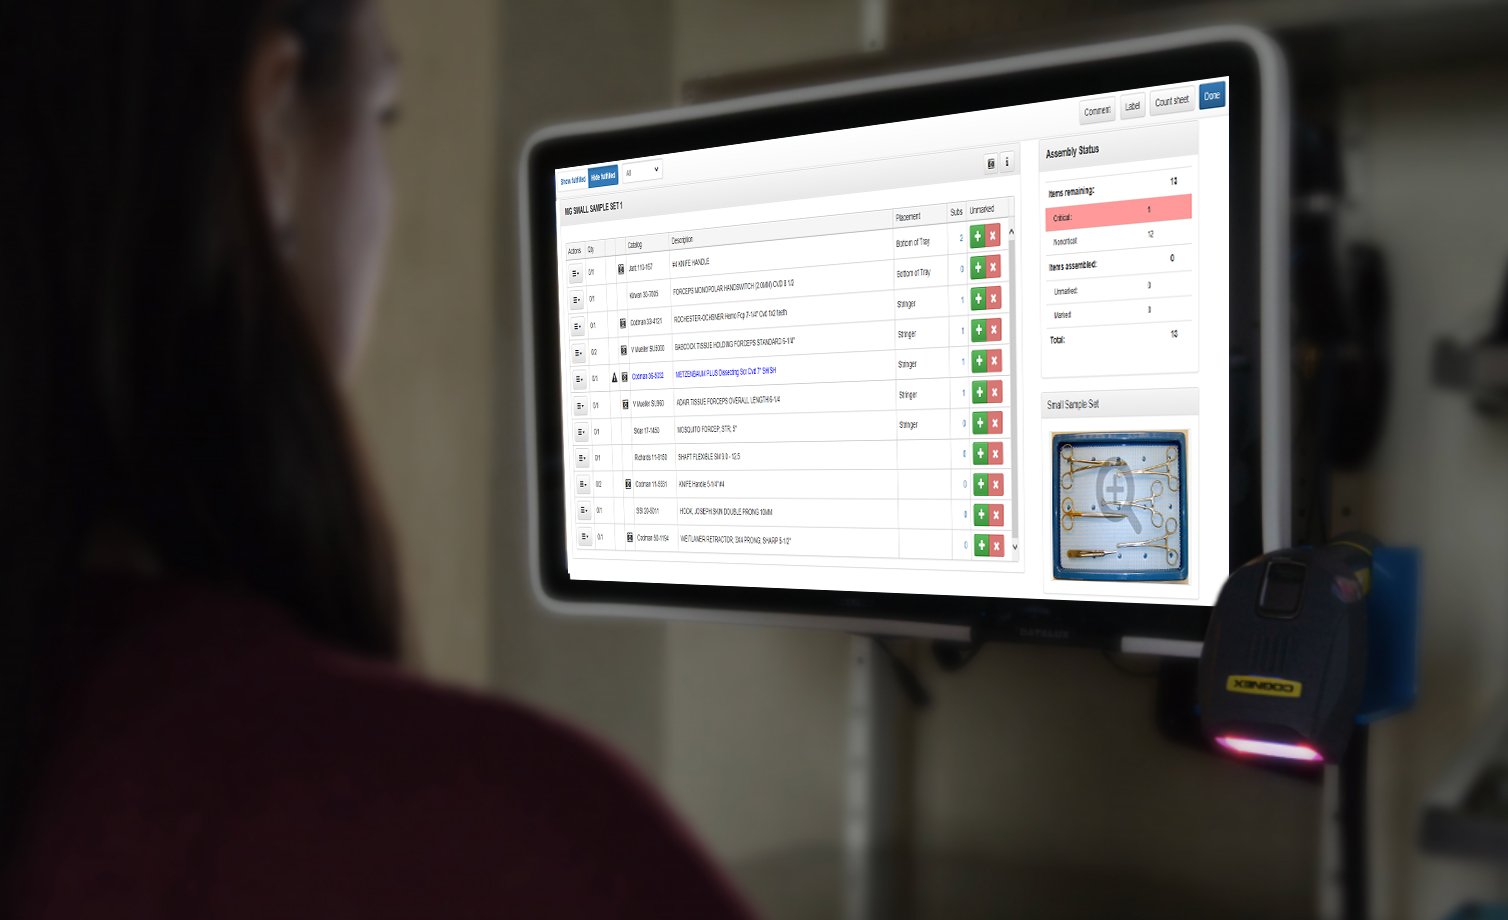
- A system of built-in checks and balances during container assembly that will create red flags or alerts for the needs of specific instruments and trays
Get specific: Generic descriptions will turn on you in the end.
To be done right, adding products to an electronic tracking system should contain as much information as possible. You want to include suppliers and catalog numbers as often as possible. Products added without that data are generic with the following weaknesses:
1. Without specifics, you can’t use OneSource, which supplies important instructions for use (IFUs) on storage, handling, and preparation of sterilized material.
2. You lose any photos attached to the products. Accurate clear images of individual instruments increase team efficiency by making new instruments familiar to the team and existing instruments familiar to new staff. Clear images of completely assembled trays can confirm contents of trays before sterilization.
3. Generic products are a common source of duplicates, which really messes with your data cleanliness. If a generic product description is the only source of information on an instrument, how it is typed and the specific word order it is typed in is critical. Simple errors like a missing or added dash, comma, space, or re-arranged word order can create a duplicate listing.
You don’t have to convert them all at once, but have a specific schedule for checking your count sheets for generics and commit to converting them to specifics on a predictable basis. Soon your data will be cleaner and much easier to track. The best products will have accurate images, clear IFUs, suppliers and catalog numbers.
More about standardized descriptions
Taking the time to develop a set list of terms, an order for those terms and a structure will ensure you have one description for each item and no duplicates. Without that commitment, a pair of six-inch long Adson forceps could be in your database a dozen different ways. Here is the system we recommend, using the forceps as an example:
- Start with the instrument type: Forceps. When creating the instrument type make sure to streamline your categories as well. Don’t include Forcep, Forceps, and FCP or Scissors, Scissor, and SCR, pick one category and stick with it.
- Follow with the common name: Forceps Adson. Here you have to be in agreement about how that appears: use of commas, dashes, slashes, etc. We recommend spaces to keep it clean.
- Include descriptors: Forceps Adson Curved. If you must use an abbreviated descriptor, like CVD, make sure your whole team does it the same way.
- End the description with dimensions: Forceps Adson Curved 6IN. We recommend limiting use of centimeters and special characters like 6” or 6-IN. Use “X” to add multiple dimensions. If a secondary dimension is needed, it might look like this: Forceps Adson Curved 6INX12MM.
To avoid having a generic description of something like “handle”, which can be in multiple categories, we use Knife-Handle as the instrument type, followed by Knurled or Beaver as the descriptors. Having the nomenclature rules clearly posted and communicated frequently will help your team streamline your data in no time.
Keep your count sheets clean and accurate.
One vulnerability SPD and OR personnel have is inaccurate count sheets. Those counts are depended upon to keep patients safe and to accurately track instruments actually used in a procedure.
Well-designed instrument count sheets contain the following information:
- Instrument catalog number, name of instrument vendor and instrument description
- Quantity of the instruments required in tray
- Space to note the actual quantity of instruments in tray
- Space for OR personnel to record instrument counts
- Name of CS technician who assembled tray and the date of tray assembly
CS personnel use count sheets to ensure all instruments in a set are accounted for when the tray is returned to the CS decontamination area and when the tray is assembled in the preparation and packaging area. It is important to confirm a tray is complete when it is received in the decontamination area.
Hopefully, your surgical instrument tracking software allows you to view the whole instrument catalog from the count sheet module. Then you can easily identify products to add to your count sheets. To keep your count sheets clean and free of duplicates, use the following system:
1. Search for the product you want to add by using its description. That will help you avoid adding duplicates in your catalog. If the product exists in the catalog, you have avoided messy duplication.
2. If the desired product doesn’t seem to be in the catalog, you can add it, but carefully! Look at how you are spelling the supplier and any special characters in the vendor’s name. Check the catalog number format and make sure that is correct. Check for misspellings. Then you can enter the product.
Instrument count sheets are used as patient safety tools in the OR to ensure that the number of instruments coming into an OR matches the number of instruments coming out. Also, the surgeon may call an instrument one thing but to track it, you need to know the real name it is entered by. For instance, the surgeon may call for “forceps” but there are two types, so you would count for a Forceps Adson Curved 6IN.
Protect your patients during tray assembly.
To make sure your patients and institution are protected, you want to take advantage of all the features in your electronic tracking software on maintaining and reprocessing instruments.
Critical aspects of maintaining instruments, as outlined in the manufacturers IFUs include:
- Documenting when an instrument is ready for maintenance, retirement, removal or replacement
- Updating the number of uses an instrument has had toward its maintenance target
- Enabling reminders about integrity testing of instruments: checking sharp edges, plates and hinges
- Recording the warranty expiration date
- Entering the cost of the instrument
- Properly assembling instruments with small screws and inserts
Additional tracking requirements for reprocessing and sterilizing instruments include:
- Noting any special handling requirements
- Making sure all instruments have updated primary sterilization methods and alternate methods if those aren’t available
Clean data saves you a world of hurt.
Sterile processing relies on good data to protect your patients, staff and institution. To accomplish that you need to:
- Have an instrument tracking system that has integrated modules
- Make sure you and your staff are up-to-date on what needs to be tracked.
- Enter all your instrumentation data correctly and consistent with the agreed upon system
It all pays off in the short term and long run by increasing efficiency, accuracy of tray assembly and processing, and protection of everyone around you.
